

The following is a list of events, deals, and attractions near the inn from "Sangimi no Yado".
Pottery workshop at Sengoku-no-yakata [Kaizuka-shi]
2025.08.29
Have you been absorbed in anything lately?
To everyone who is busy every day. Have you had any time recently to concentrate all your energy on one thing and immerse yourself in it?
If you can’t think of anything, I highly recommend this.
This time, I went to the “Sakura-no-Terrace” in the grounds of Mizuma-dera Temple to try my hand at pottery.
Contents
Let’s try your hand at pottery workshop!
Sakura-no-Terrace, located near Mizuma no Yado.
-
Sakura-no-Terrace is located adjacent to the grounds of Mizuma-dera Temple.
It was originally renovated from Mizuma Kaikan, which was used as a place for people to interact and engage in activities.
The 2F is a free rest area, offering an open space where you can enjoy the cherry blossoms right in front of you.
It is open all year round, not just during the cherry blossom season, and is equipped with air conditioning and heating for summer and winter. It is the perfect place to take a break while visiting Mizuma-dera Temple or strolling around the area.
On the 1F, souvenirs from Mizuma Monzen-Machi and Kaizuka are on sale, and there is also an exhibition of old photographs of Mizuma Monzen-Machi.
There is also a pottery salon called “Sengoku-no-yakata” here.
This time, let’s try our hand at pottery at this pottery salon. 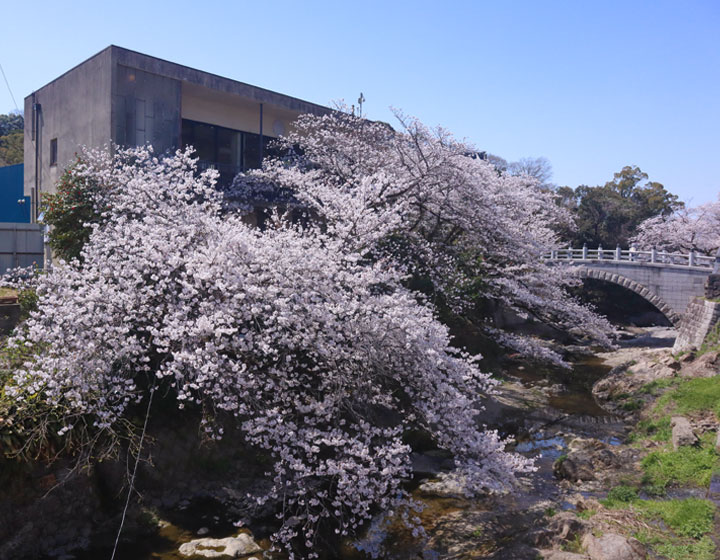
How to apply for the Sengoku-no-yakata pottery workshop.
The pottery workshop at Sengoku-no-yakata is by reservation only.
Reservations can be made using the reservation form on the Sengoku-no-yakata official website.
There is a template for entering information, so fill in the necessary details as instructed, submit the form, and once you receive the reservation confirmation email, your reservation is complete.
This time, we had two staff members accompany us, so we made a reservation for 3 people.
-
Hand-building course
1kg of clay / 120-min. workshop and firing of 2pieces.
You can take home two pieces from the works you create after they have been fired.Weekday rates
¥3,500- / 1person
(For reservations of 2 or more people)Sat, Sun, holiday rates
¥4,500- / 1person
(For reservations of 2 or more people) -
Electric pottery wheel
2kg of clay / 80-min. workshop and firing of 2pieces.
You can take home two pieces from the works you create after they have been fired.Weekday rates
¥2,500- / 1person
(For reservations of 2 or more people)Sat, Sun, holiday rates
¥3,500- / 1person
(For reservations of 2 or more people) -
Electric pottery wheel(no firing)
2kg of clay / 80-min. workshop.
If you don’t need a finished product, we recommend this option.Weekday rates
¥3,500- / 1person
(For reservations of 2 or more people)Sat, Sun, holiday rates
¥4,500- / 1person
(For reservations of 2 or more people)
You will receive your fired work at a later date (approximately 3-4 weeks after the workshop).
Delivery of works is limited to Japan.
Delivery overseas is not possible, so if it is difficult for you to receive your work, please choose the workshop-only course.
Even if you are alone, you can try each course for an additional ¥2,000.
With the electric potter’s wheel, you can also add clay (¥2,000/2kg (including firing of 2pieces)).
In addition, there are other courses such as “painting and firing.” For details, please visit the Sengoku-no-yakata official website.(Japanese only)
-
What should I wear and bring for a pottery workshop?
For the pottery workshop, you can come empty-handed as aprons and other tools are provided, but please be mindful of your clothing and nails.
For the electric pottery wheel workshop, the wheel is placed between your legs, so skirts are not allowed.
We recommend wearing clothes that can get dirty and sneakers.
Long nails can catch on the workpiece, so keep your nails short and remove or simplify any nail polish.
If you have weak nails, it is a good idea to protect them with a top coat.
Bringing hand cream for after the workshop is also convenient. 
Let’s go to the pottery workshop!
The day of the workshop.
-
We arrived at Sakura-no-Terrace with the staff.
If you come by car, you can park at the free parking lot at Mizuma-dera Temple.
Sakura-no-Terrace is right in front of the parking lot.
Follow the blue wall and flag to the passageway.
There is an entrance with a noren curtain on the right, so let’s enter the studio from there. 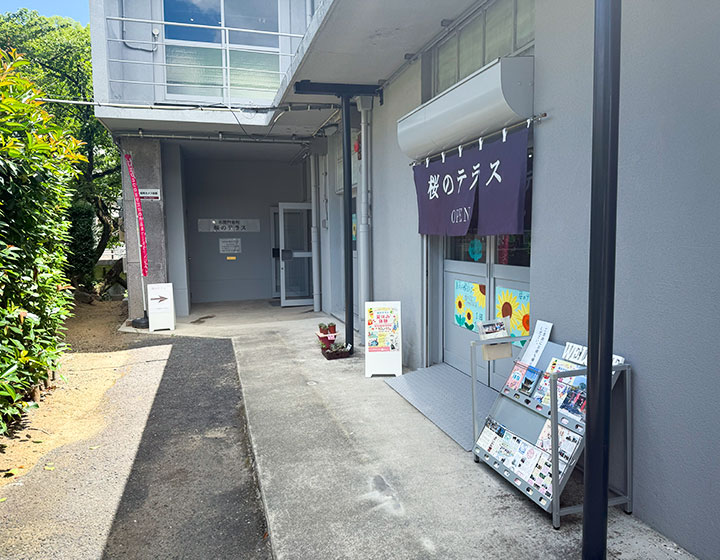
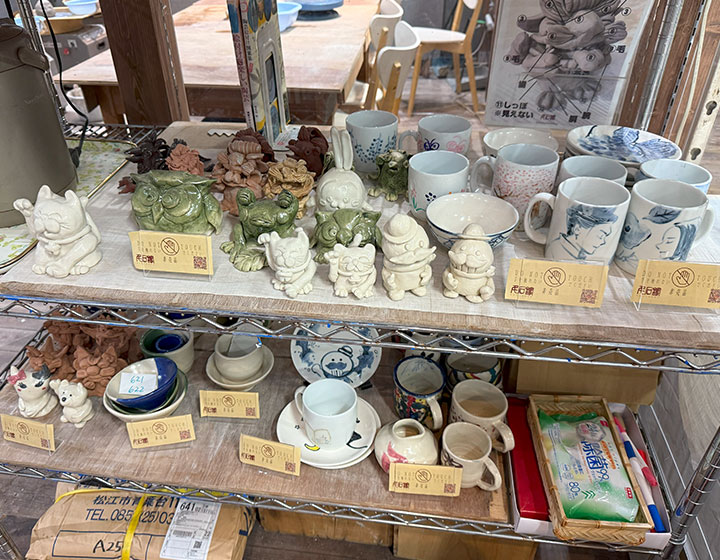 Samples made in the studio and students’ works. There are also works made by pottery workshop participants.
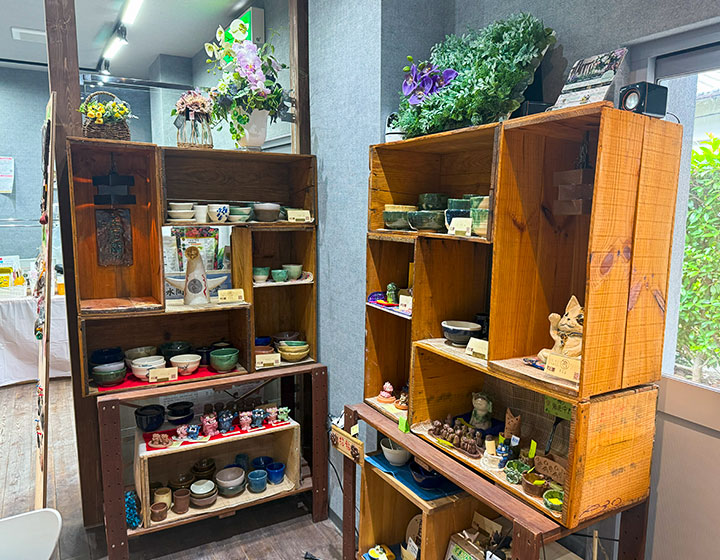 In addition to pottery, there are also decorative crafts such as artificial flowers.
 Moss balls displayed in the corner of the studio. Were these also made by hand?
The pottery studio is bright and cheerful.
The works of other participants and students who create pieces every month are stylishly displayed.
After greeting the instructors, the pottery workshop begins. First, we write the date and our names on the name cards we are given.
These will be displayed in the photo booth alongside the finished pieces.
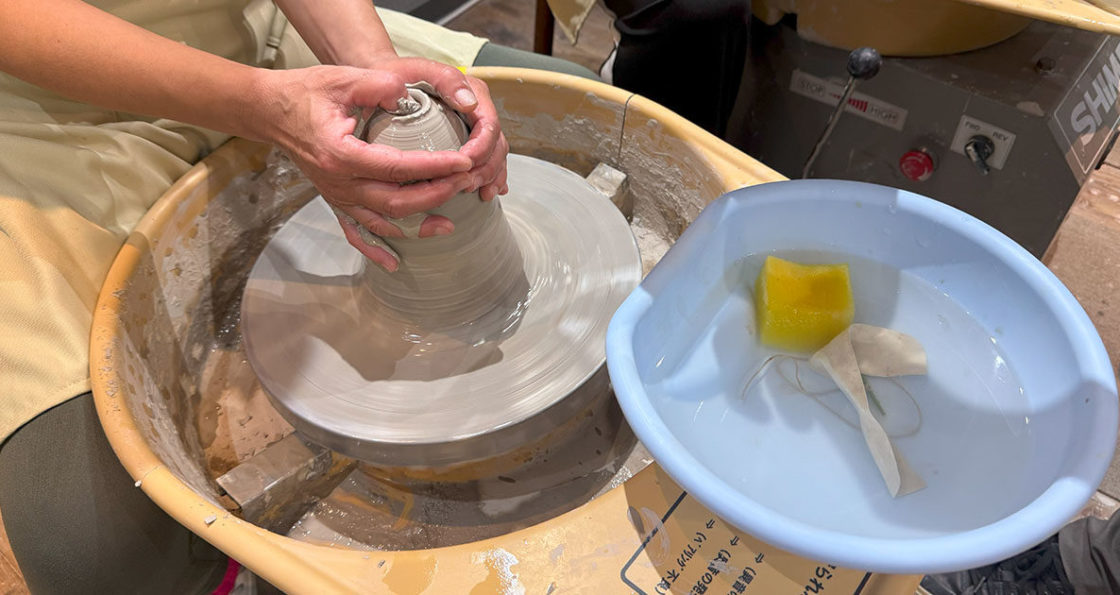
This time, two staff members workshop the “electric pottery wheel,” while I workshop the “hand-building (hand-turned pottery wheel).”
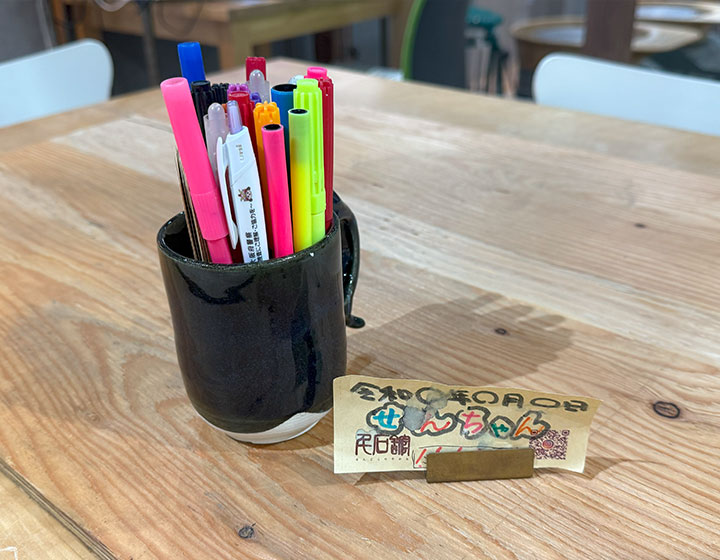
Write cards with colorful markers.
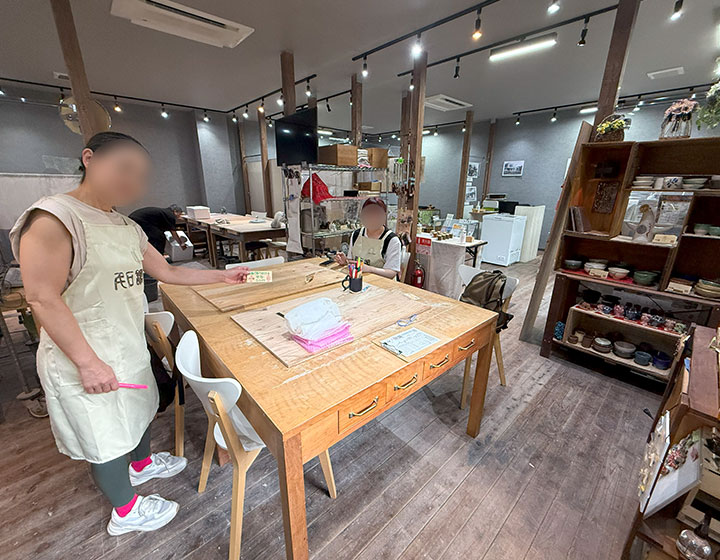
With my apron on, I’m all set!
First, try the “electric potter’s wheel”.
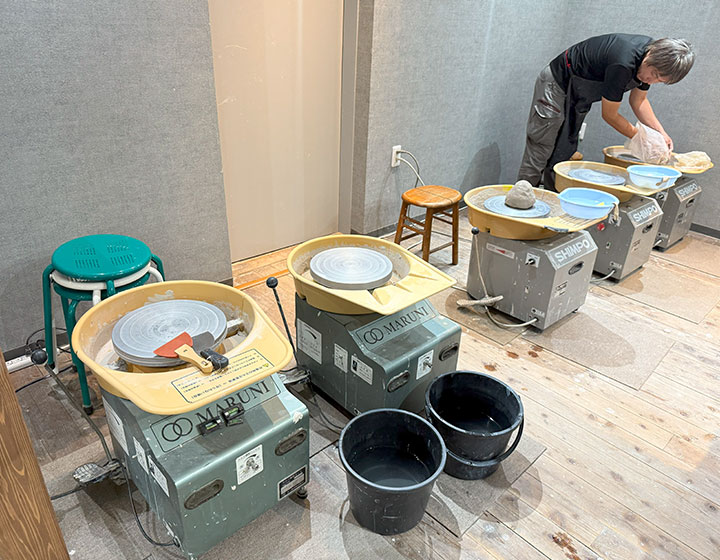
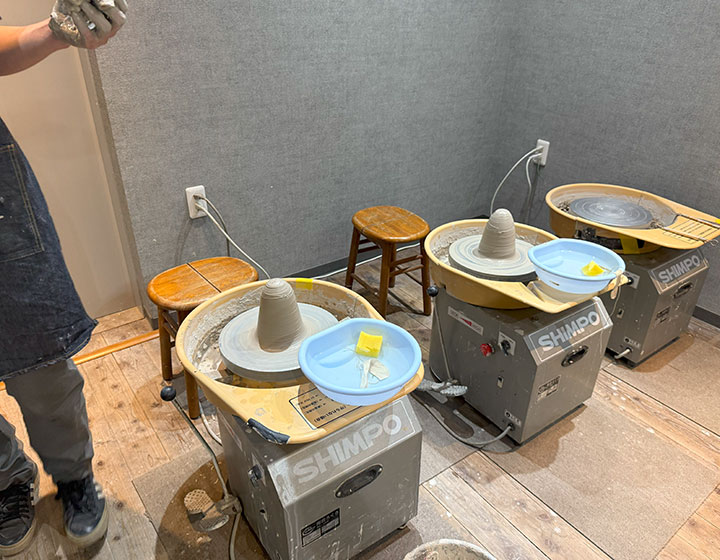
Electric pottery wheel. There are five of them lined up in the studio.
In the electric pottery wheel workshop, we first observe the process of “tsuchi-goroshi” (centering).
Although the name sounds a little disturbing, it is an important process in electric pottery wheel work.
In tsuchi-goroshi, the potter spins the wheel while pushing the clay up from below and down from above to remove any unevenness and center the clay.
This process is repeated to shape the clay. In the workshop, the instructor performs the tsuchi-goroshi.
Watching the instructor’s demonstration.
 Use a sponge to thoroughly moisten the soil.
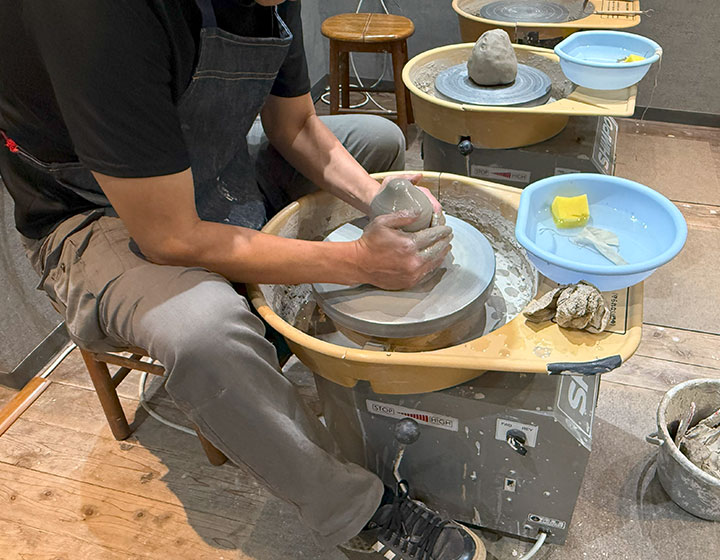 As soon as the instructor’s hands touch the soil, it immediately begins to change shape.
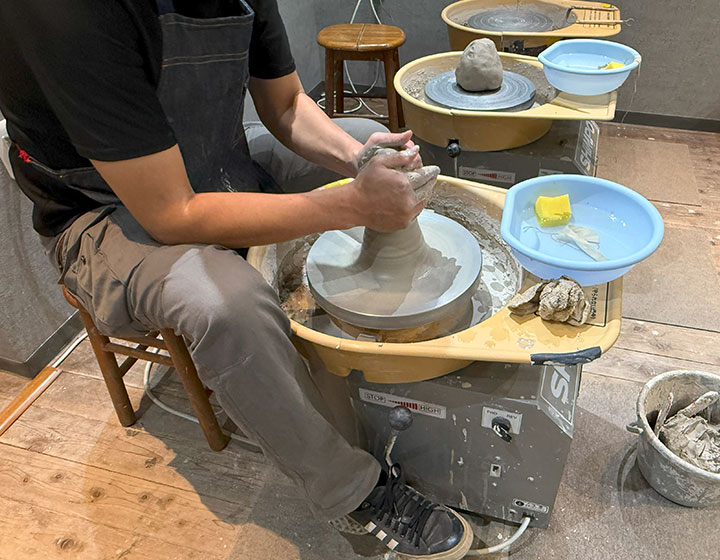 The “core” of the clay appears as if by magic.
It shaped it up in no time.
Comparing before and after the tsuchi-goroshi process, the contact surface between the potter’s wheel and the clay is tightly adhered and spreads out like a hem, with the clay stretching straight vertically.
The instractor makes it look easy, but if there is too little moisture, friction increases and the center shifts, and if there is too much, the clay becomes soft and mushy.
Even if your hands move, the center will shift, so it is difficult to keep your hands in the same position. The instructor’s skill, which seemed to happen in the blink of an eye, was truly that of a master craftsman.
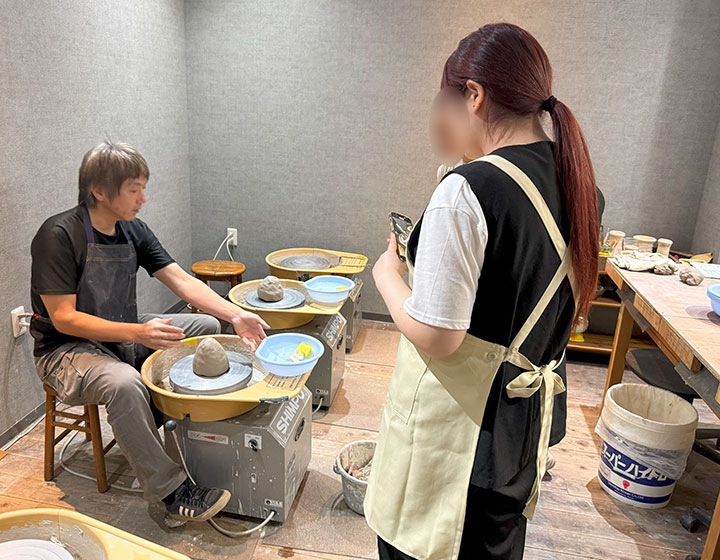
Now the preparations are complete. The staff takes turns sitting in front of the potter’s wheel with the instructor and begins shaping the clay.
What kind of work will they create?
Next up is the “hand-building”.
We will also start offering hand-building workshops.
In hand-building, you shape the clay using a hand-turned potter’s wheel.
It is difficult to make the same beautiful shape as you would with an electric pottery wheel, but the appeal of hand-building is that it is easy to express the shape and individuality of your hands, and you can create warm pieces.
After preparing the clay that has been kneaded and shaped, you will receive a lecture from the instructor.
After discussing it, we decided to make a kobachi(small bowl) for our first piece.
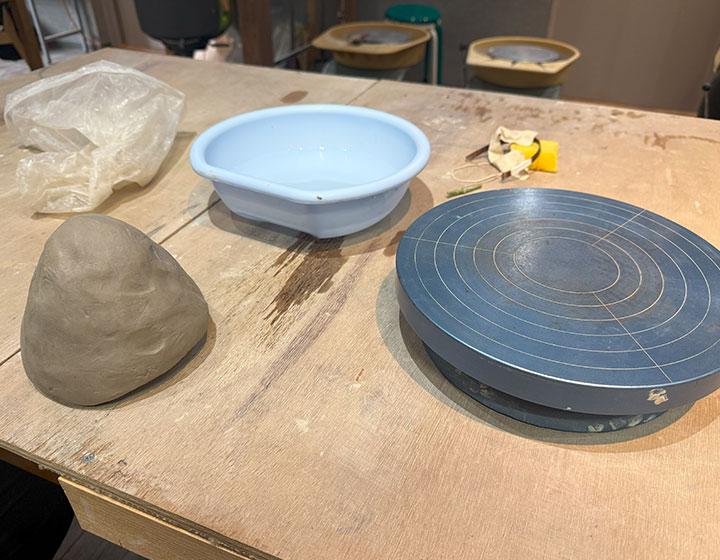
We have 2 kg of clay prepared for today. That’s quite a lot.
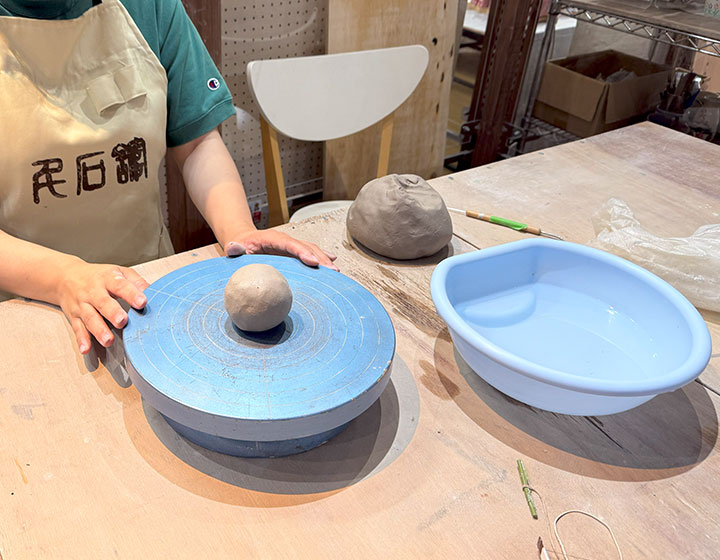
First, prepare the amount of clay you will need and place it in the center of the potter’s wheel.
Clay used in pottery shrinks by about 13% after firing.
The base needed for a small bowl is about the size of a fist, so tear off that amount of clay, roll it into a ball, and place it in the center of the pottery wheel.
It looks large for a kobachi(small bowl), but this size is necessary.
Tap the rolled clay with the palm of your hand and spread it evenly in the center of the potter’s wheel. Be careful not to make it too thin.
Next, tear off another piece of clay, roll it on the table with the palm of your hand, and stretch it evenly into a string.
The instructor will demonstrate most of the process for the first piece.
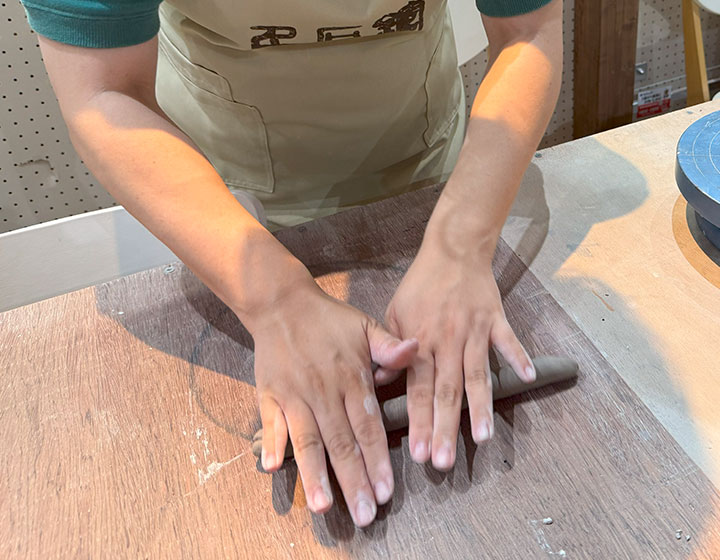
Still within the realm of playing with clay. Similar to baking bread.
Wrap the clay into a ring shape so that it does not protrude from the edge of the base, and blend it into the base.
Not yet.
Make another string and blend it in to complete the basic shape of the vessel.
Here, too, it is important to keep the thickness of the clay uniform.
If it is too thin or too thick, it may crack or break during firing (the process of baking the clay in a kiln).
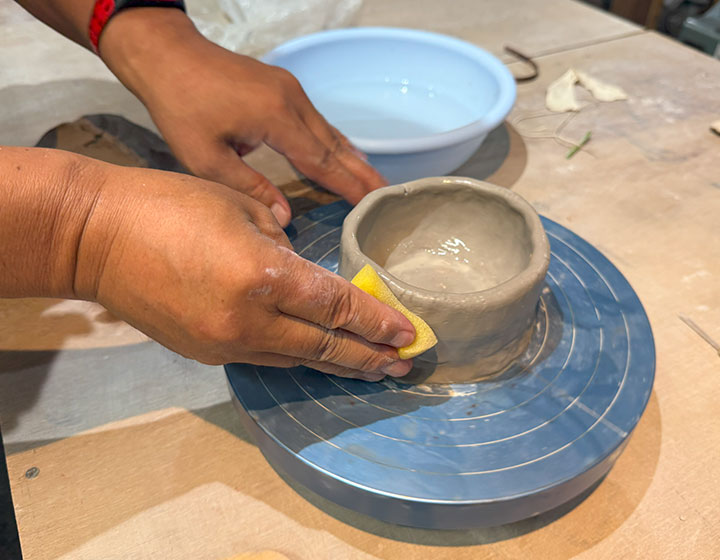
Moisten the surface with a damp sponge to blend it in better.You can rest assured that the instractor will make any necessary corrections.
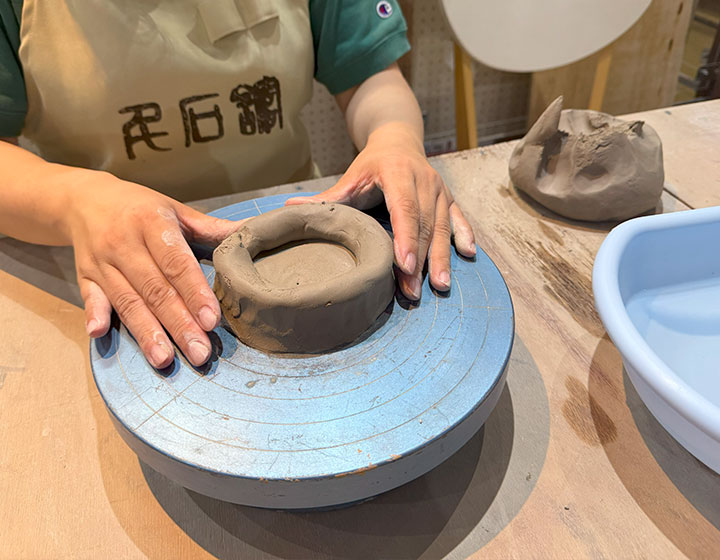
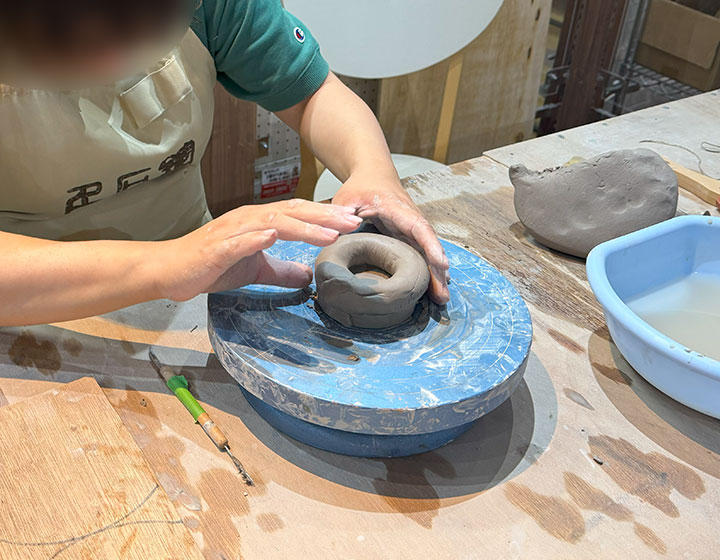
Once you have achieved a certain shape, it is time to use the hand-turned pottery wheel.
After spinning the wheel vigorously with your right hand, use both hands to adjust the height of the small bowl.
My hands are carried away by the momentum of the pottery wheel!
This is really difficult, and as I mentioned earlier, it’s similar to making bread, but of course, clay is completely different from bread dough in that it’s heavy and hard.
It takes quite a bit of strength to hold onto the clay as it spins around… The photo above shows a bad example of how to hold the clay.
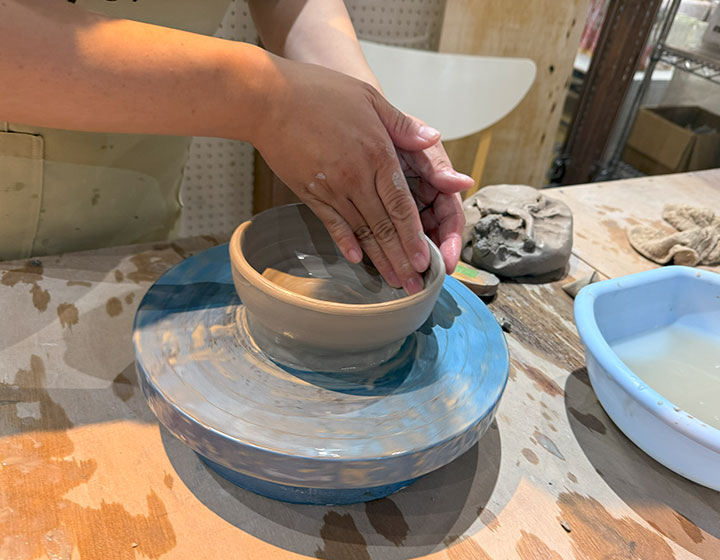
I’m trying to follow instructer’s advice, but…
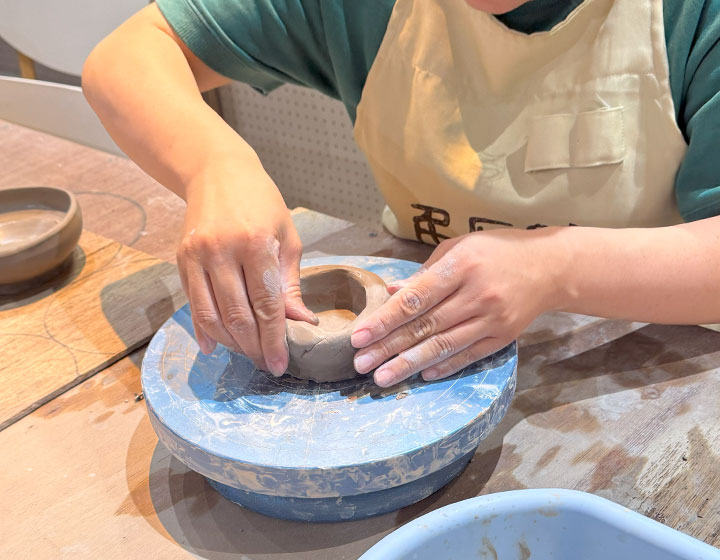
The more I worked on it, the more it gradually became distorted and uneven in thickness… and then the instractor would correct it, and the process would repeat itself…
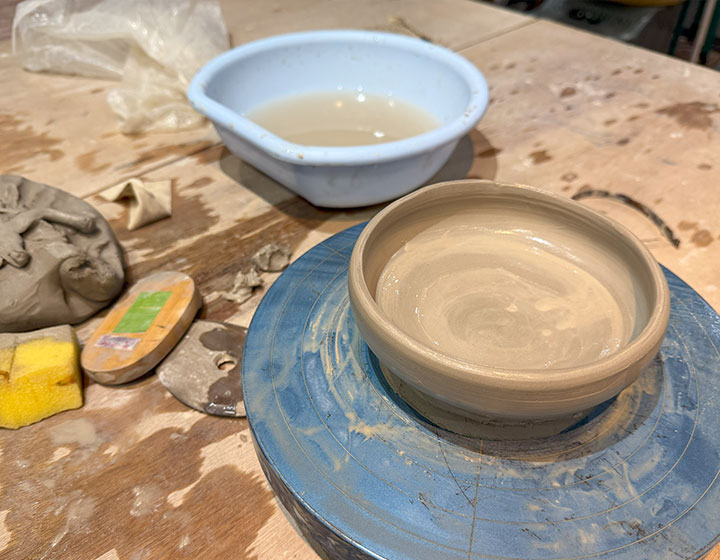
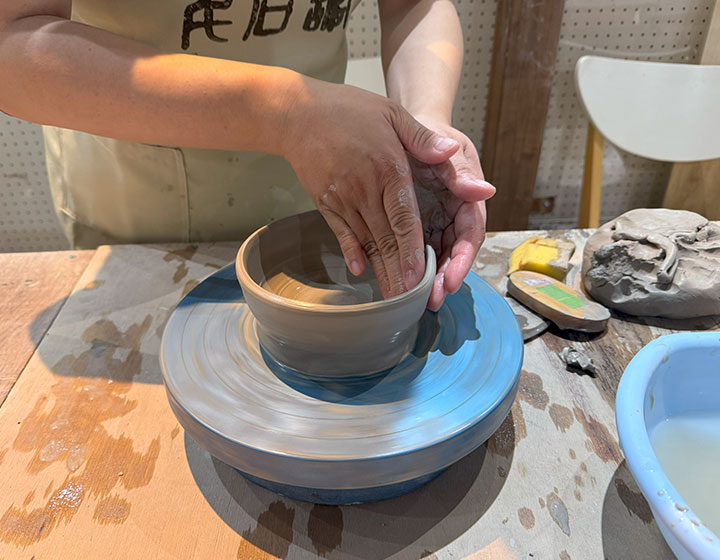
Completed!
My 1st hand-building workshop piece, a small bowl, is complete!
To finish, you separate the piece from the pottery wheel by holding the string taut in both hands and passing it horizontally across the bottom.
I think this one turned out pretty well… I hope.
It has a very beautiful shape, and I’m looking forward to seeing how it turns out after firing.
However, I only helped a little, and it was mostly the instructor who made it.
If I had continued doing it myself, I would have definitely failed, but next time I want to try making a piece on my own!
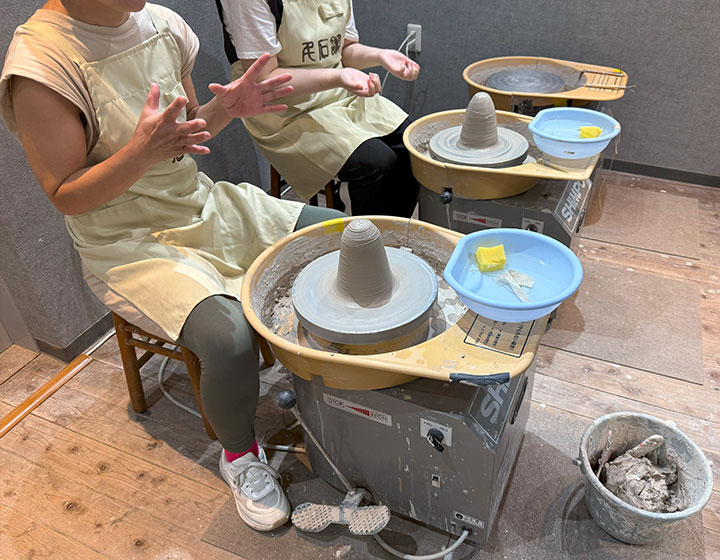
Meanwhile, the electric pottery wheel group…
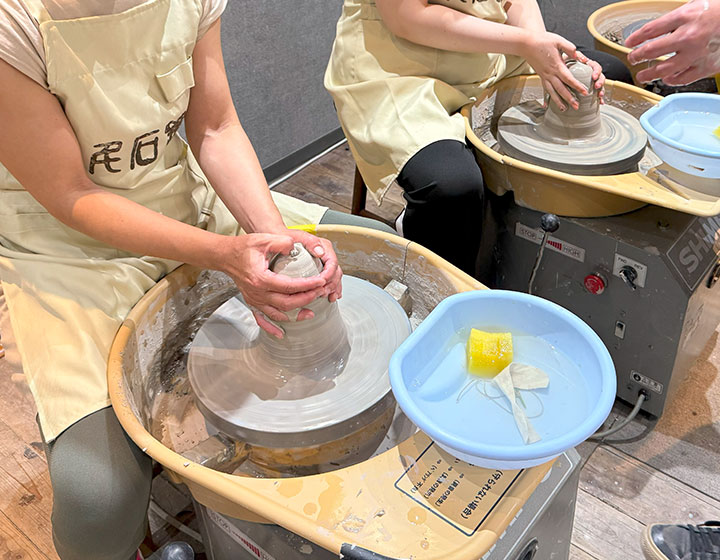 Start molding.
 They are both working seriously.
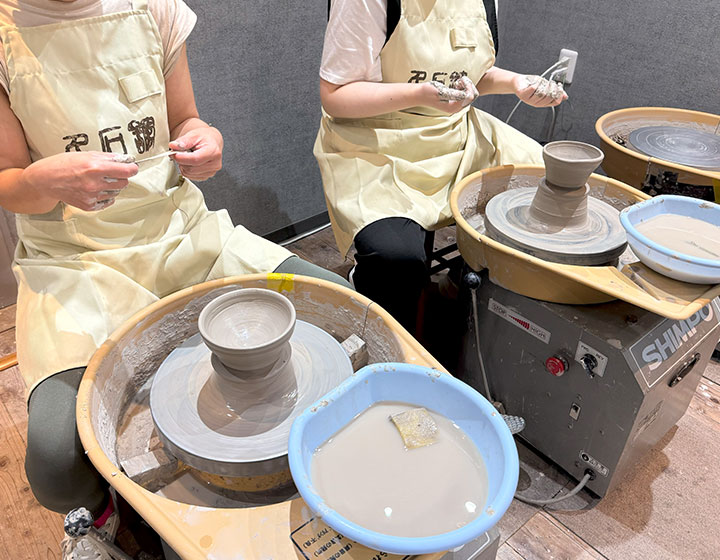 A beautiful piece of work.
It seems that the first piece is complete. They cut the piece off with a string and start making the second piece.
It seems that you can make about two or three pieces with an electric pottery wheel.
I have to work hard too!
The 2nd work is…
Now that the first piece is complete, there is still more than half of the clay left. We will use this to make a second piece.
This time, the instractor suggested that we try making a Yunomi(Japanese teacup), so we tore off the same amount of clay as before and rolled it into a ball to form the base of the Yunomi.
The instractor said, “I’ll be watching from the side this time, so please call me if you need any help.”
Let’s concentrate and get to work.
Now that the base is ready, next make a string of clay, form it into a ring on top of the base, and blend it in.
I’m trying my best to follow the instructor’s teachings.
Hmmm… Will this improve?
To sum up, this piece was a complete failure on the pottery wheel, and my instractor told me, “It won’t turn out well even if you fire it, so let’s forget about it…”
The clay dried out a little, causing cracks and friction to increase, and when I tried to fix it by adding water, it became soggy, and the sides became uneven, some too thin and some too thick, making it impossible to adjust.
I turned the failed piece back into a lump of clay and wondered what to make next…
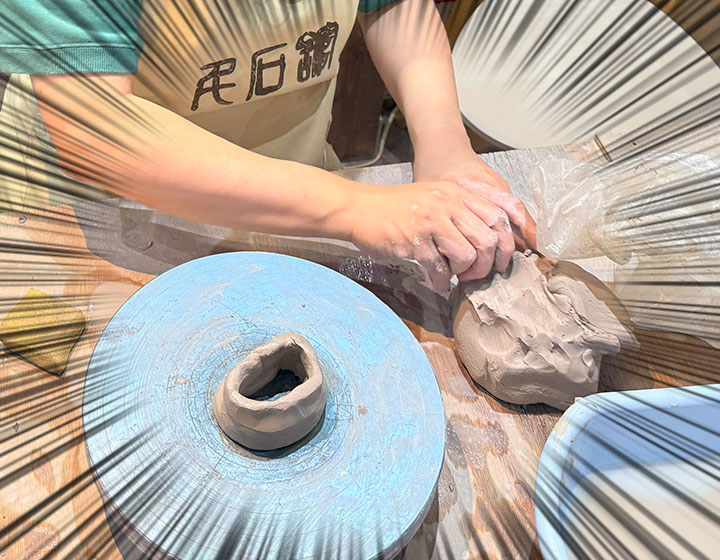
I want to make a Maneki-neko!
At Sengoku-no-yakata, they sometimes make lucky charms such as shisa and owls for events and workshops.
So, I changed my plan and decided to make a Maneki-neko (Beckoning cat).
I looked at the works that the instractor had made before, but tried not to refer to them too much and started making the base from scratch.
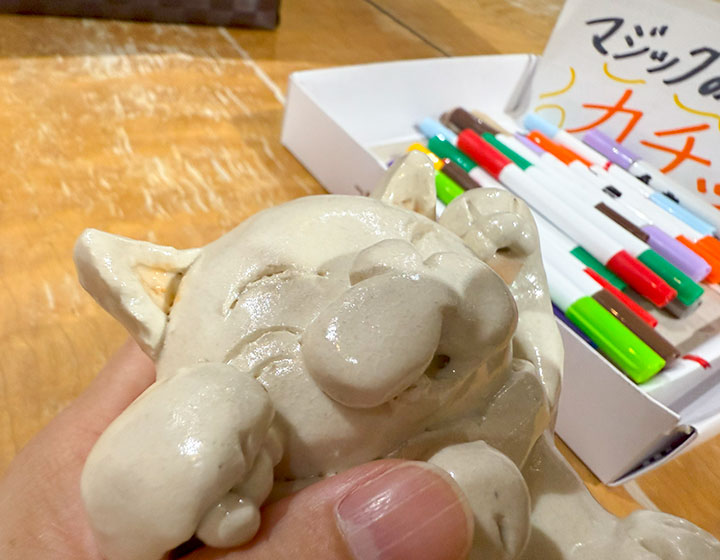
 This is my third piece. It’s taking a long time, so I’m rushing to make the parts. As a result, the cat has a short body.
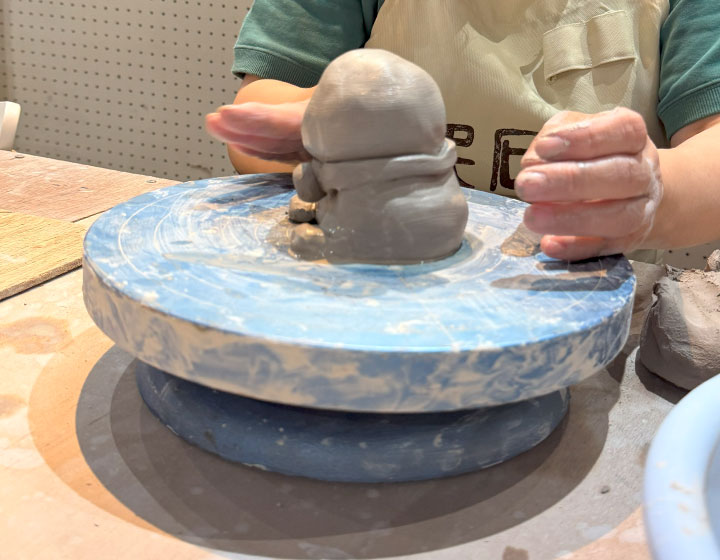 The head is very difficult! It’s hollow inside, so it’s very difficult to make it round.
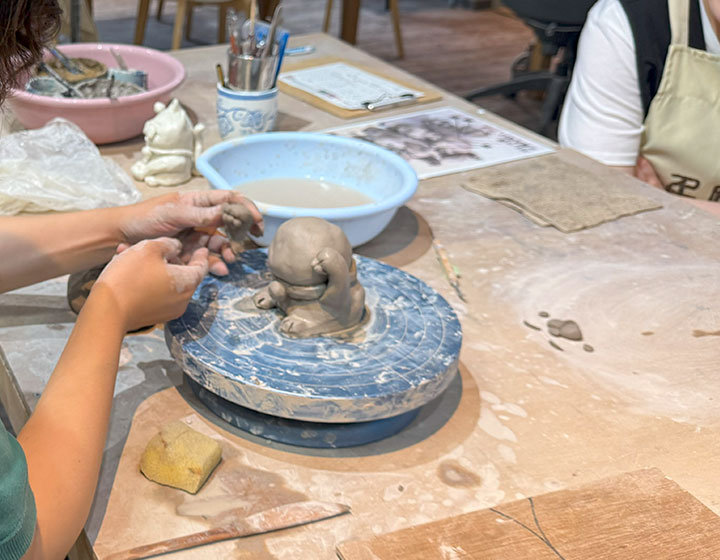 Make the body, head, collar, and bell in that order.This is where the arms are attached.
“You started to come alive after you started making the maneki-neko,” said the instructor.
I was so absorbed in my work that I didn’t take many photos, but I made the parts first and then assembled them.
I found the face and ears particularly difficult. The position and size can completely change the impression of the finished product.
The instructor told me not to compromise on this, so I made the ears many times and thought about their position, and when I was satisfied, I attached them using dobé (clay mud).
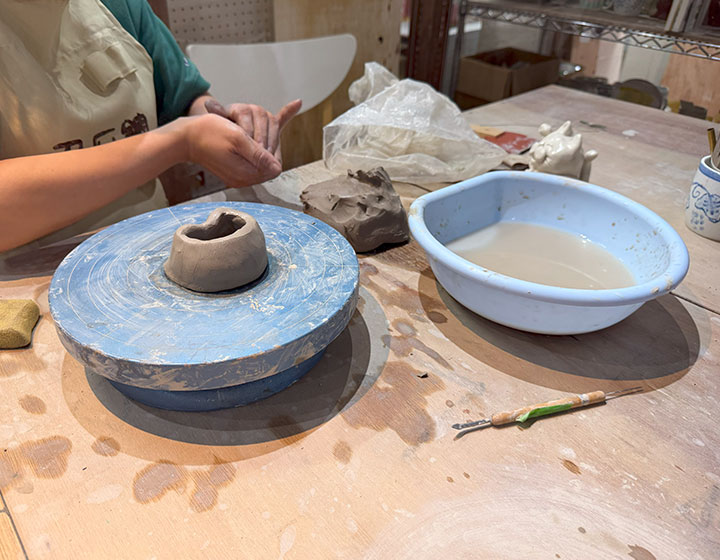
Work completed!
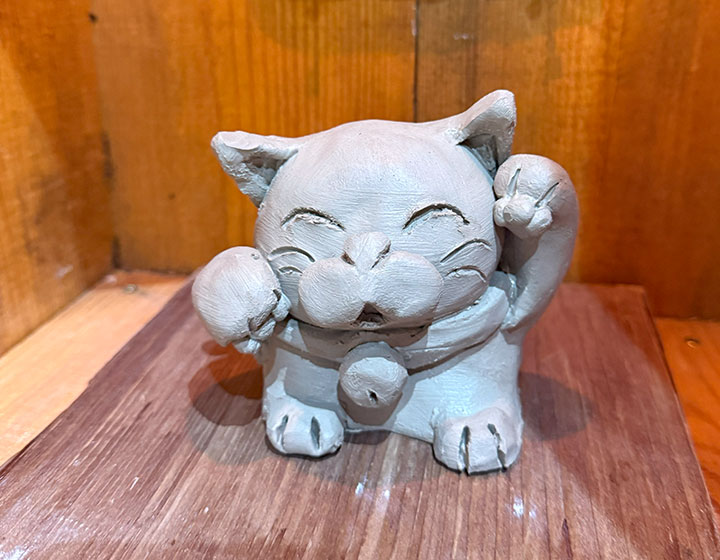
Finish.
It was awkward and time-consuming, but I was able to complete almost the entire process of making the maneki-neko by myself!
I wasn’t able to make the pottery I had planned, but the instructor praised my maneki-neko, and it was a fun workshop from start to finish.
I am relieved and filled with a sense of accomplishment that I was able to finish two pieces.
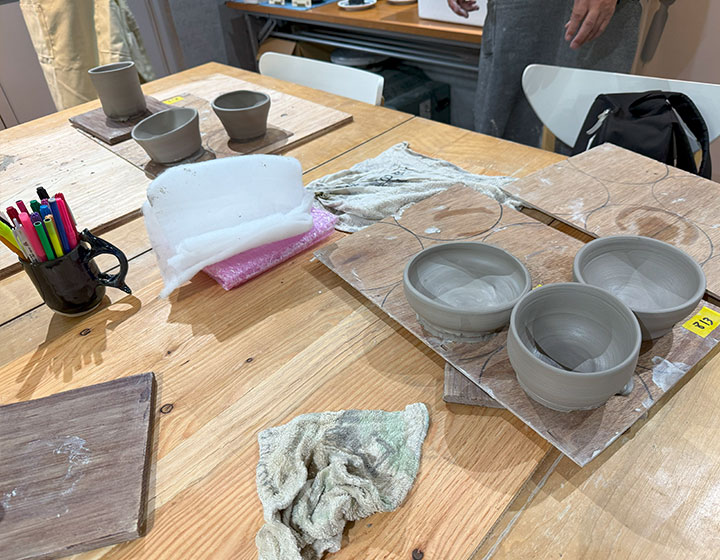
Works created by the staff. Select two works to be fired from here.
I displayed my favorite finished piece at the booth along with my name card and took a photo.
I was so absorbed in the workshop that I was only able to see the pieces made by the electric pottery wheel group after they were finished.
 A cat with a short body. It looks like it is washing its face with both hands raised.
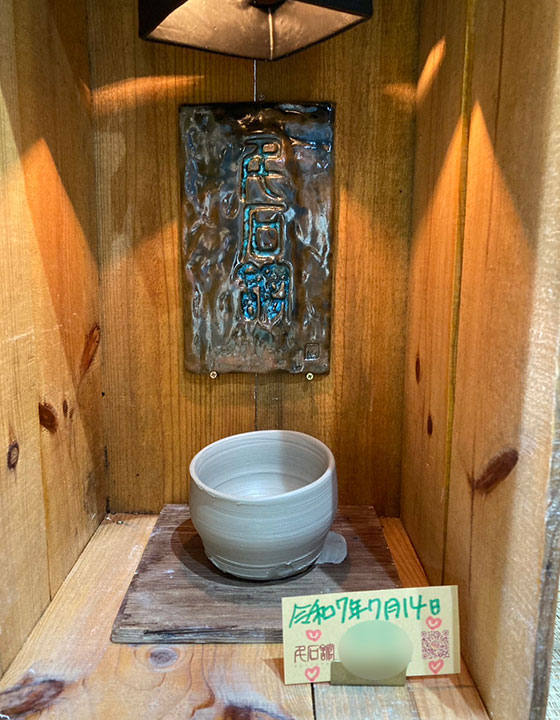 This vessel was made by our staff. It seems that it was difficult to separate, so there is some clay remaining on the base, but it has a beautiful shape and is very lovely!
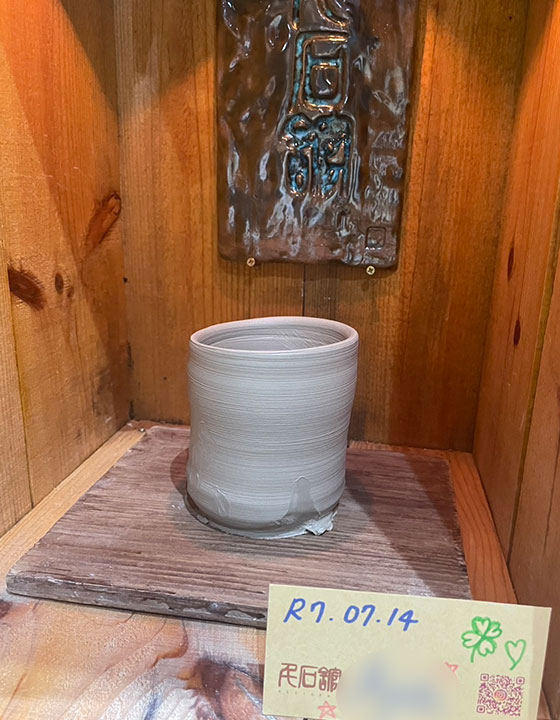 Another staff made a yunomi. It looks quite large in this state, but it will shrink to about 85% of its original size. It looks very easy to use!
-
Once the shaping is complete, the piece is left to dry for several days, then first fired in a kiln to create a “bisque,” glazed to determine the color and texture, and then fired again in the kiln to complete the piece.
It takes an average of 3 to 4 weeks from the workshop date to receive the finished piece.
The instructor will apply the glaze, so the final finish is up to them. You will see the finished piece for the first time when you receive it, so it will be very exciting to see how it turned out! 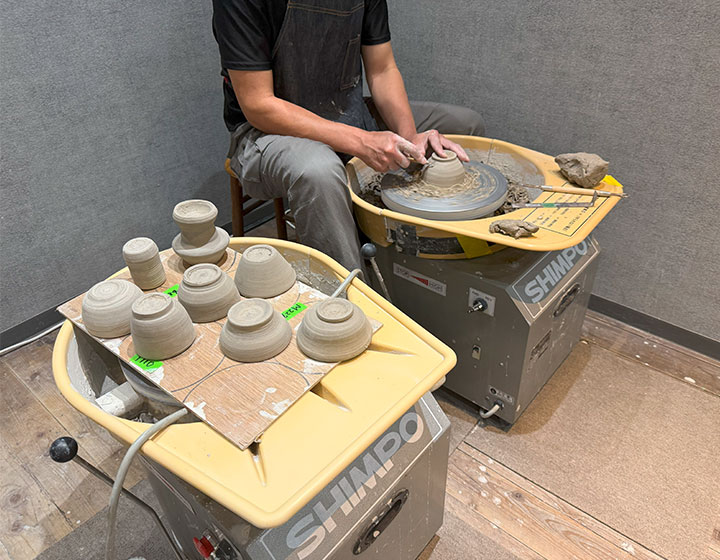
-
How do I receive the finished work?
The exchange numbers will be announced on the Sengoku-no-yakata official Instagram account in the order in which the works become available for pickup.
The exchange numbers will be distributed on the day of the workshop, so please keep them safe until you exchange them and check Instagram regularly.
You can have your finished work mailed to you or pick it up at the workshop location.
Sengoku-no-yakata official Instagram 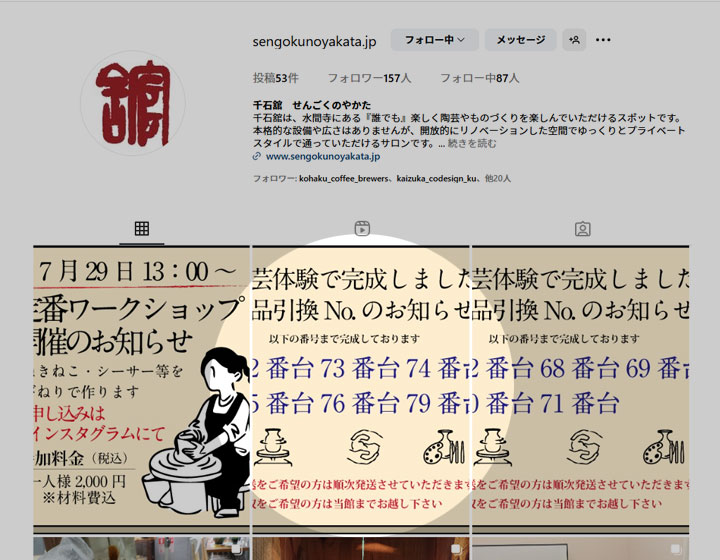
That concludes the workshop.
As I had hoped, I was able to forget about time and concentrate on crafting, and I am proud to say that I was able to immerse myself in the process.
Even though I must have been tired from maintaining the same posture for a long time and concentrating, I feel refreshed thanks to the sense of fulfillment and satisfaction I gained.
The calm atmosphere of the classroom, the instructors’ easy-to-understand guidance, and their enjoyable conversation allowed me to enjoy a wonderful “unusual” experience.
All that’s left is to wait for the work to be completed…
Unveiling of the completed artwork.
I went to pick up the artwork.
About three weeks after the experience ended, one day.
The exchange numbers for our pieces have been announced on Senkoku-no-yakata’s official Instagram. Finally, we get to see our pieces!
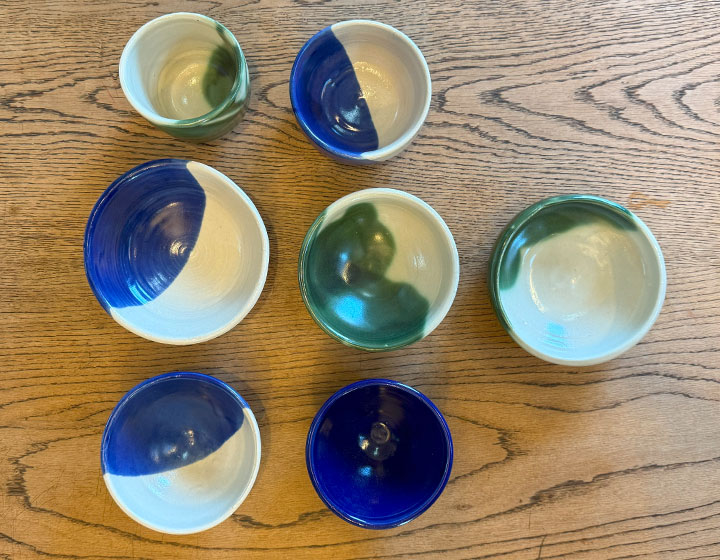
I lined them all up.
We created a total of seven pieces this time. All the pieces we shaped were fired for us!
During the electric wheel and hand-building experiences, up to two pieces can be fired, but additional pieces can be fired for an extra fee.
These vessels held dear from the day they were shaped. Yet their fired forms evoke an even deeper affection.
Each one makes me want to pick it up and admire it—to marvel at how it achieved this color, this texture…!
(Though I’ve only made one piece of pottery myself.)
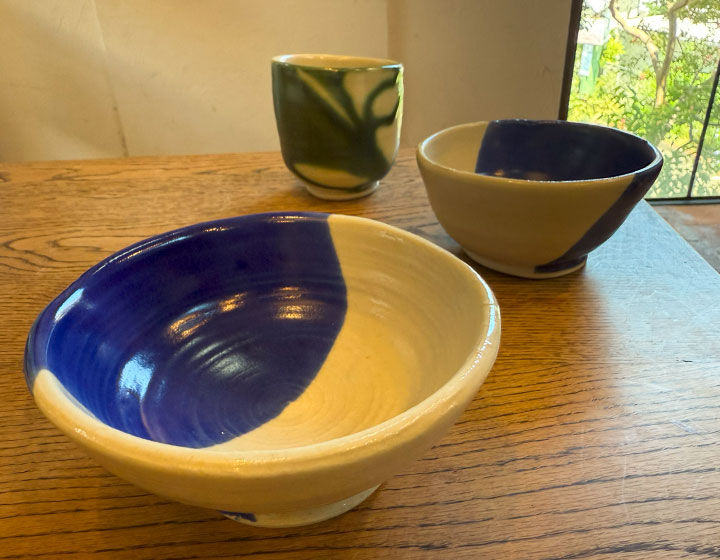 The vessels created by Staff Member A.
The glaze application on the teacups is fascinating! The vessels created by Staff Member H. Though made by the same person, each possesses its own unique character.
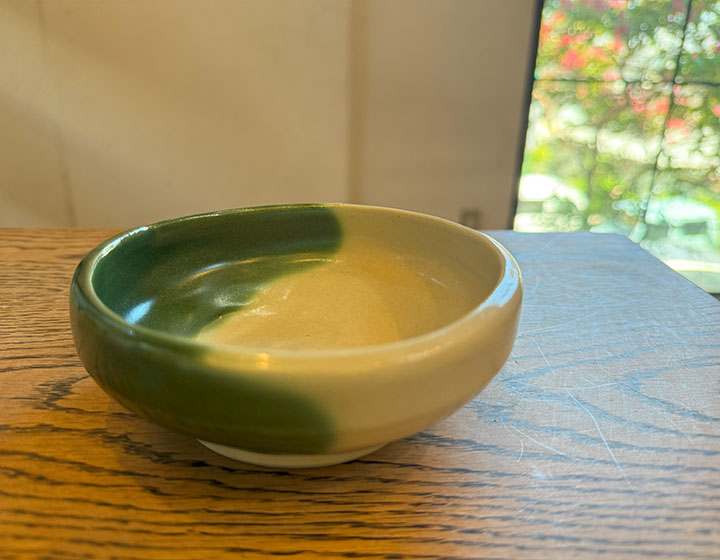 The bowl I made with my instructor. It’s perfect for serving nikujaga stew, or you could fill it with water and float flowers in it—it might look quite lovely.
“Huh? Seems like something’s missing…?”
To those of you who were concerned.
Yes, the author’s maneki-neko isn’t here, is it? Actually, regarding that piece—
Thanks to the kindness of the Senkoku-no-yakata staff, I got to paint it right there on the spot when I went to pick it up!
Let me color it my way!
Regarding the maneki-neko, the teacher had told me beforehand, “We’ll fire it with white glaze.” But when I actually went to pick it up, they kindly suggested, “Would you like to try adding some color?”
Since there were other customers participating in the experience that day, I accepted their offer while making sure not to disturb anyone else and worked quickly.
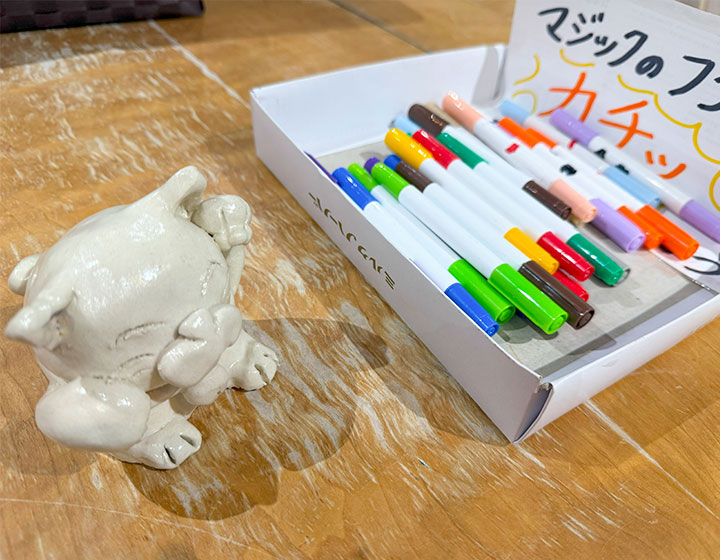
A brush pen that makes it easy to color detailed areas like inside the ears. Start with light colors.
For painting (coloring), use ceramic markers.
After drawing or coloring, you can set the colors by baking in a 200°C oven (a household oven is fine).
The markers used for painting experiences feature two interchangeable tips: a fine nib for easy line drawing and a soft brush tip for smooth coloring.
This time, I completed the entire process using only the brush tip. It’s incredibly easy to use and apply color with, and the brush tip reaches fine details and recessed areas effortlessly!
A wide range of colors is available, and mistakes can be erased, making it user-friendly for children too.
One important note: Before baking, the marker ink can transfer to your fingers, clothing, or other colored tips. To avoid this, try not to layer colors and minimize touching areas you’ve already painted.
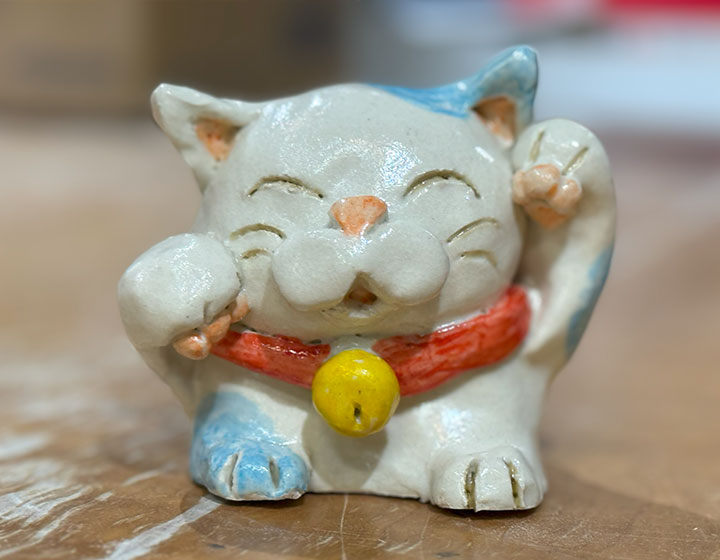
The color was added.
So here’s the painted maneki-neko.
Centered around a light blue evoking the pure flow of Mizuma Temple, it’s a pale-colored maneki-neko finished without using any dark colors except for the collar.
…Oh my. Could this one be… kinda cute…?
By chance, they were firing other painted pieces that day, so I slipped mine in next to them. The maneki-neko was finished the very next day.
And here is the completed piece after firing.
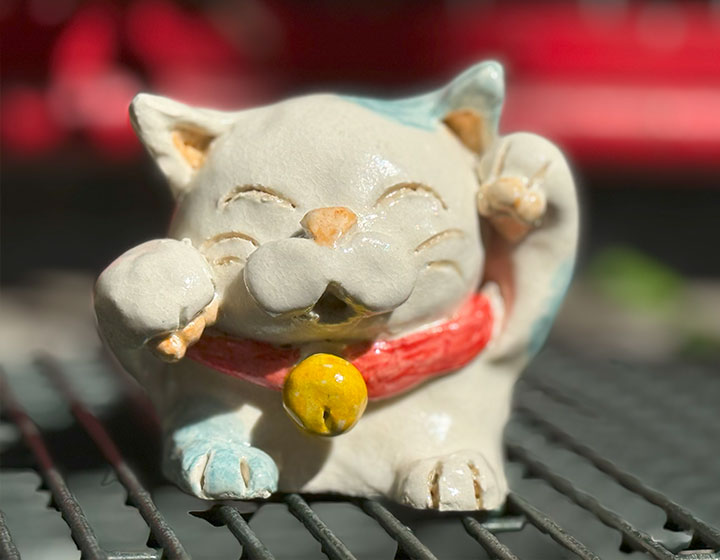
How cute!
The ink has set in the exact color it was applied!
When viewed under the sun, the colors appear even more vivid and adorable, resulting in a very charming finish, I think.
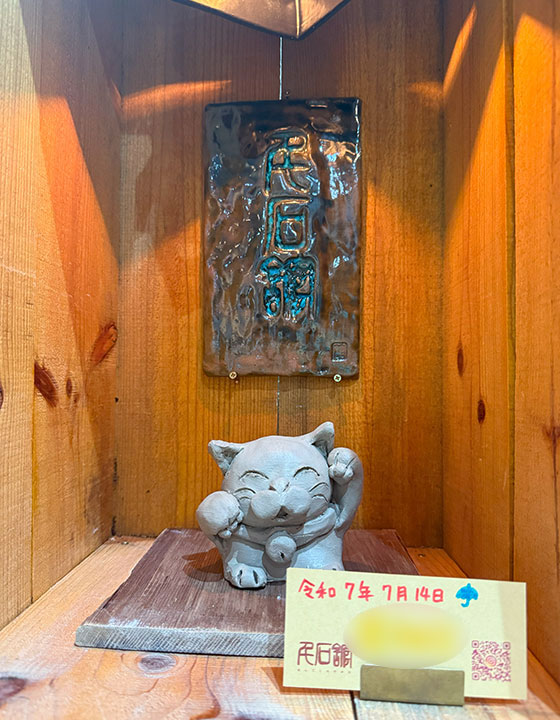
We are exhibiting the bowls and maneki-neko we created this time.
This concludes the entire pottery workshop at Sengoku-no-yakata. A selection of the pieces created during this session is currently on display for a limited time at Mizuma no Yado. Creating your own unique vessel to use daily, one that adds color to your everyday life—I truly felt this was a special experience.
Pottery workshop is an activity enjoyed by people of all ages and genders. You can create together with family, friends, or a group in a lively atmosphere, or immerse yourself in the world of creation in quiet solitude.
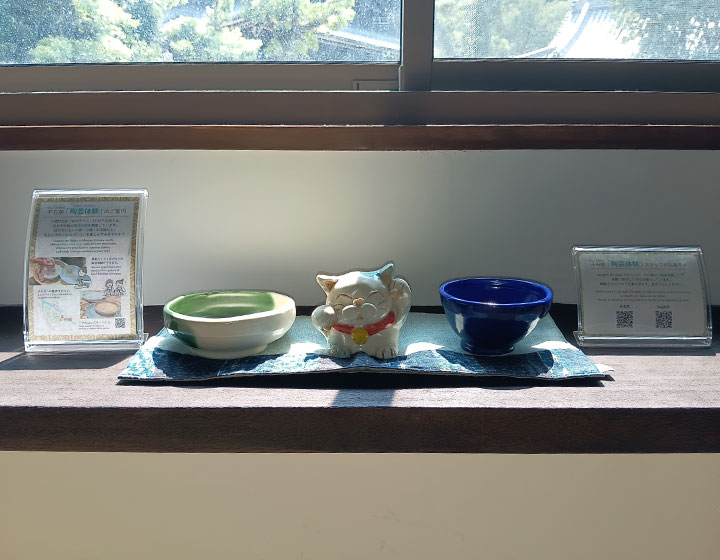
The displayed pottery and cat. Please do take a look. But please don’t touch them…
ACCESS
A short walk from Mizuma no Yado.
-
From Mizuma no Yado to Sengoku-no-yakata, walk through the grounds of Mizuma-dera Temple toward the parking lot.
It takes about 3 minutes on foot.
If using public transportation, it is a 10-minute walk from Mizuma Kannon Station (Mizuma Railway Mizuma Line).
Alternatively, the closest bus stop is “Mizuma Kannon Mae (Y2)” on the Kaizuka City Community Bus “Harmony Bus.”
Sengoku-no-yakata official Website 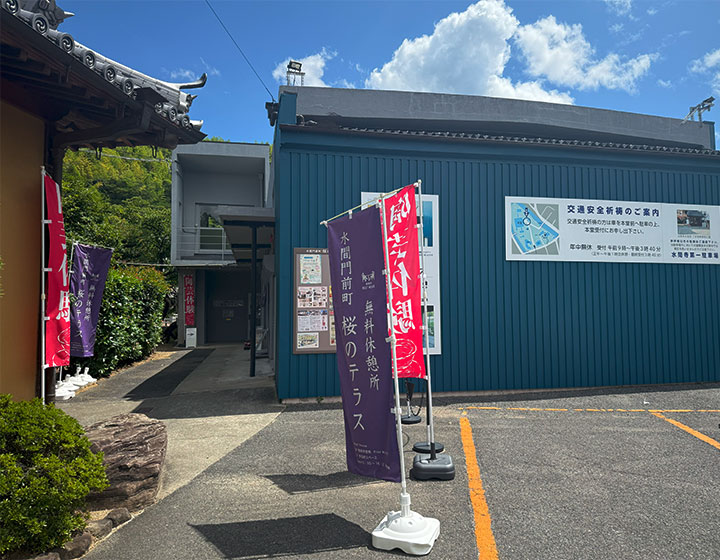
ブログ Blog
sangimi no yado ブログ
-

Water Art Festival 2025 : Enjoy water-themed art experiences in Mizuma Monzen-machi
2025.10.1
A new art project in Mizuma, a town that has lived alongside two rivers! The Kogigawa River, originating from …
 Autumn Highlights / Cafe / Event / Festival / Food / Gourmet / green space / heritage attraction / hiking / Kaizuka-shi / Mizuma no yado / Osaka / park / Rural Japan / shrines and temples
 -

Tanzan Shrine’s Kemari Festival [Plenty of Photos! ]
2025.9.9
Cherry blossoms in spring, Maple leaves in autumn. A white ball dances in the elegant garden. Tanzan Shrine, a…
Asuka no yado / Autumn Highlights / Event / Festival / green space / heritage attraction / hiking / History of Japan / Mahoro no yado / Nara prefecture / Popular Sights / Rural Japan / Sakurai-shi / shrines and temples / Spring Highlights -

Recommended Gourmet / Spots in Kaizuka-shi & Surrounding Area
2025.9.3
Rich history and bountiful mountain produce and seafood. Kaizuka-shi and its surrounding notable spots The Sen…

